
Home
Documentation
VM-Sickbay
MOA
News
About
VMDK Handbook - FAQ and Howtos
by
Ulli Hankeln
In emergencies visit Sickbay ![]()
[ <<< = back to Table
of Content ]
This chapter lists some frequently asked questions.
Several Howtos explain how to manage some common tasks.
For a list of content see
My VM starts fine but seems to have lost the data of the last 6 months ... help !!!
Power down the VM - if that is not possible or takes
a long time - kill the VM.
For reasons that do not matter right now the VM was started with a misconfigured
snapshot-chain.
If you continue to use it like this chances to recover the normal state
of the VM will go down south.
Do NOT allow any filesystem checks to continue - abort any chkdsk or fschk
operations.
Do NOT run any defragmentation tools.
After you have shut down or killed the VM make a copy of all vmware.logs
, the vmx-file , the vmsd-file
and all small text-size vmdk-files.
Now don't act in haste.
Go away from that VM and do not touch it the next hour ... drink a coffee
... relax.
Once the danger to do anything very stupid is gone go back to the VM.
If mission critical data is missing make a full backup of the complete VM
as it is now.
The next steps are best done with a copy ...
Follow this checklist :
1. - find out which vmdk was configured in the vmx-file used during
last start - check vmware.log and the vmx-file
2. - find out which vmdk was used during last successful starts -
check the older vmware.logs
3. - check if the vmdk that was used during last successful starts
is still present
4. - repeat the first steps in case the VM uses more then one vmdk
5. - now you should know WHAT is wrong
6. - ask co-workers if they changed settings , edited the vmx-file
or moved or deleted files
7. - analyse the history of this VM - , was it ever expanded, moved
, imported
8. - check if any automatic backup-tools ever touched this VM
9. - now you should know WHY something went wrong - does it make sense
? - if not go back to 1.
10. - look at the involved vmx-file and vmdk-descriptions - find a way to
correct them with minimal edits
11. - does one edit of the vmx plus one edit of the CID-values per vmdk
fix it ? - if NO ... are you sure ?
12. - are you sure ?
13. - make your minimal invasive edits
14. - find out if any vmem files are present - remove or rename them
15. - inspect the vmsd file - adjust it or if unsure remove the file
16. - find out if any vmsn-files are present - if unsure what to do with
them - remove them
17. - find out if any vmss-files are present - remove them
18. - boot the VM into a LiveCD that does not automount
anything - check if state of data is the expected one
19. - optional - copy lost data from the LiveCD to a network-share
20. - boot VM from harddisk into SAFE mode
It is expected behaviour that on first start the original Operating system
complains and wants to check the disks.
At this point allow it and cross your fingers ....
DO NOT SHORTCUT THIS CHECKLIST
<<<
VMware tells me I am running low on disk-space ... help !!!
This often happens during Snapshot-manager operations or with normal VMs
that use any type of growing virtual disks.
The VMware GUI then pops up a message and tells you to free up some space
, continue or abort the operation.
Do not answer this popup.
Very likely both options will fail so the only possible way is to fix the
problem at the root.
Free up some space NOW - migrate other VMs to a different datastore on ESX
or move some other data to a portable USB-disk on hosted platforms.
When done - answer the popup.
What is the most portable vmdk-format ?
The most portable format is twoGbMaxExtentSparse
This format
- can be stored on USB devices formatted with FAT32
- can be stored on one or more DVDs without need to split the file first
- can be natively used by all hosted platforms
- can be imported to ESX with vmkfstools
How to create a vmdk-description for a dd-image
The following procedure can be used with all types of dd-like diskimages
as long as they are
- uncompressed
- do not use a special header
- include a MBR
This will not work with images of single partitions.
Example:
we need a vmdk description for a full dd disk-image named image.dd which
size is 8589934592 bytes.
A dd-image like that could be created like this
dd if=/dev/sda of=image.dd
As our dd-image is a uncompressed full disk image we can use the vmdk-type
"monolithicFlat" or "vmfs"
Uncompressed full disk-images don't have any special header so we set the
offset 0
For IDE to be used with Workstation ...
8589934592 / 512 = 16777216 (thats the <size in sectors>)
16777216 / 1008 = 16644.063492063492063492063492063
rounds down to 16644 - as that is more than 16383 we can take 16383 as <number
of cylinders>
createType="monolithicFlat"
RW 16777216 FLAT "image.dd" 0
ddb.geometry.cylinders = "16383"
ddb.geometry.heads = "16"
ddb.geometry.sectors = "63"
ddb.adapterType = "ide"
For SCSI to be used with Workstation
16777216 = 16065 = 1044.3333955804544039838157485216
rounds down to 1044 - we can use 1044 as <number of cylinders>
createType="monolithicFlat"
RW 16777216 FLAT "image.dd" 0
ddb.geometry.cylinders = "1044"
ddb.geometry.heads = "255"
ddb.geometry.sectors = "63"
ddb.adapterType = "lsilogic"
For use with ESX we need the createtype vmfs so this time the result looks
like.
Note the differences in the extent description line - it uses no offset
createType="vmfs"
RW 16777216 VMFS "image.dd"
ddb.geometry.cylinders = "1044"
ddb.geometry.heads = "255"
ddb.geometry.sectors = "63"
ddb.adapterType = "lsilogic"
How to safely edit embedded vmdk-descriptions
This vmdk-types use embedded descriptions : monolithicSparse
, streamOptimized
In case you want to edit this embedded description do NOT use hex-editors.
This files can be very large so it may take a long time to load them into
a hexeditor.
Also you have to be very careful not to change the size of the file while
editing.
The much safer and easier ways is to extract the embedded description first.
On a Windows host this can be with the tool dsfo.exe
After you have done your edits re-inject the description with dsfi.exe
The dsfok-tools were created by Dariusz Stanislawek
homepage
download dsfok-tools : here
or here
Example:
You must edit test.vmdk which is a monolithicSparse snapshot. Current size
is 50 Gb.
Opening this file with a hexteditor is unwise.
So extract the embedded description with
dsfo.exe test.vmdk 512 1024 descriptor.txt
Now you can edit the description with a texteditor like Scite, Notepad Plus
or Wordpad.
When you are done with the edits re-inject the description with
dsfi.exe test.vmdk 512 1024 descriptor.txt
In the monolithic sparse formats the embedded description must fit in the
second and third sector of the file.
So when extracting or injecting it make sure you never change anything outside
this range.
If you accidentaly change the first byte of the fourth sector the vmdk is
kaputt !
When working with the dsfo.exe and dsfi.exe always use the same range. 512
1024 is a safe range.
Do NOT use a larger range - this will corrupt the vmdk !
If you use a Linux system you can use dd for the same purpose.
Again do not use hexeditors unless you eat binary files for breakfast ...
To extract use
dd if=test.vmdk of=descriptor.txt bs=1 skip=512 count=1024
To inject use
dd conv=notrunc,nocreat if=descriptor.txt of=test.vmdk
bs=1 seek=512 count=1024
Thanks to Robert from Vienna for the Linux dd-command and to Brian Lagoni for fixing it.
How to rewrite monolithicFlat to vmfs format
The monolithicFlat and the
vmfs are very similar.
They both use a *-flat.vmdk data chunk.
To use an existing *-flat.vmdk with any of this two types a small manual
edit
in the description is suffiecient.
1. set createType : monolithicFlat
for use with Workstation or vmfs for
use with ESX
2. check the extent description: use FLAT for Workstation and VMFS for ESX
3. check the offset value : use 0 for Workstation and remove the offset
for ESX
4. check the ddb.virtualHWVersion and adjust if necessary
| Workstation | ESX |
|---|---|
| # Disk DescriptorFile |
# Disk DescriptorFile |
How to fix a broken CID-chain - example
Let's have a look at a broken snapshot-chain.
Tthe example you will see next is taken from some case I had in the german-forum
recently.
The 3 descriptorfiles are taken from a corrupt snapshot-chain - the user
had accidentaly moved the basedisk and had started it without the snapshots.
He noticed the problem just in time and didn't do anything in the VM and
powered it down at once. He had used disks of type monolithic-sparse (one
piece growing)
So he had to extract the embedded descriptorfiles first - see
Here is the result
descriptor for "basedisk.vmdk"
# Disk DescriptorFile
version=1
CID=3160ee93
parentCID=ffffffff
createType="monolithicSparse"
# Extent description
RW 20971520 SPARSE "basedisk.vmdk"
# The Disk Data Base
#DDB
ddb.adapterType = "ide"
ddb.geometry.sectors = "63"
ddb.geometry.heads = "16"
ddb.geometry.cylinders = "16383"
ddb.toolsVersion = "6368"
ddb.virtualHWVersion = "4"
descriptor for "basedisk-000001.vmdk"
# Disk DescriptorFile
version=1
CID=06ebe4dc
parentCID=daf6cf10
createType="monolithicSparse"
parentFileNameHint="basedisk.vmdk"
# Extent description
RW 20971520 SPARSE "basedisk-000001.vmdk"
# The Disk Data Base
#DDB
ddb.toolsVersion = "6368"
descriptor for "basedisk-000002.vmdk" -----
# Disk DescriptorFile
version=1
CID=9f63f0fe
parentCID=06ebe4dc
createType="monolithicSparse"
parentFileNameHint="basedisk-000001.vmdk"
# Extent description
RW 20971520 SPARSE "basedisk-000002.vmdk"
# The Disk Data Base
#DDB
ddb.toolsVersion = "6368"
When he had moved back the basedisk to the original directory VMware complained:
can't open snapshots because basedisk has been changed!
Let's find out how VMware noticed that ...
look at the descriptions of the snapshots: each of them has a line
parentFileNameHint = "path_to_parent" - this is used to find the
parent-disk when VMware launches a vmx-file that has a snapshot as disk-reference.
This paths must point from child - child - .... - child - parent.
Check if this correct in this case: yes - no problem.
Now every disk-description also uses two lines with CID-notes.
The CID is a random value that gets autocreated by VMware.
To check if any changes have been made to a parent - a child always notes
the CID value of its parent.
If this is still the same next start everything is fine - if not all alarmbells
ring.
Let's check this case:
the second child expects this value parentCID=06ebe4dc
on his parent.
the first child has this CID=06ebe4dc and expects
this parentCID=daf6cf10 on his parent
the parent has this CID=3160ee93
Noticed anything ?
Yes - the CID of the parent-disk is not the one that was expected by the
child.
So this snapshot chain is broken - you can not use it in a VM any longer.
Can we fix that?
That depends - if you have done no changes to the basedisk you may be lucky
and come out with a disk that is clean and readable. If you have done something
like a defrag in the basedisk while you used it on its own the result can
force a checkdisk at startup and can end with a complete data loss.
So whenever you do something like this don't panic - think twice before
you do anything at all. First understand what has gone wrong!
Back to the example:
This is the repaired version of descriptor-files that I send back to the
poster.
descriptor for "basedisk.vmdk"
# Disk DescriptorFile
version=1
CID=daf6cf10
parentCID=ffffffff
createType="monolithicSparse"
# Extent description
RW 20971520 SPARSE "basedisk.vmdk"
# The Disk Data Base
#DDB
ddb.adapterType = "ide"
ddb.geometry.sectors = "63"
ddb.geometry.heads = "16"
ddb.geometry.cylinders = "16383"
ddb.toolsVersion = "6368"
ddb.virtualHWVersion = "4"
descriptor for "basedisk-000001.vmdk"
# Disk DescriptorFile
version=1
CID=06ebe4dc
parentCID=daf6cf10
createType="monolithicSparse"
parentFileNameHint="basedisk.vmdk"
# Extent description
RW 20971520 SPARSE "basedisk-000001.vmdk"
# The Disk Data Base
#DDB
ddb.toolsVersion = "6368"
descriptor for "basedisk-000002.vmdk"
# Disk DescriptorFile
version=1
CID=9f63f0fe
parentCID=06ebe4dc
createType="monolithicSparse"
parentFileNameHint="basedisk-000001.vmdk"
# Extent description
RW 20971520 SPARSE "basedisk-000002.vmdk"
# The Disk Data Base
#DDB
ddb.toolsVersion = "6368"
Looks almost identical - but I'm sure you will find what I have edited.
How to restore a lost vmdk-description from a vmware.log
Unless you have misconfigured VMware to not write logs the last log contains
all data to restore a lost descriptor for a vmdk from scratch. This also
applies to embedded descriptors!
Proceed like this:
1. find out which disktype you need
2. copy a sample descriptor from the examples
3. grab data from the log and replace the entries from the sample
- 3a. doublecheck the parameter adapterType against
the vmx-file.
- 3b. if unsure about disk-geometry - compare against the disk-geomtry-table
A working vmdk-descriptor must declare these values:
version - set this to "1"
CID , parentCID , createType
Extent description - this may be more than just one line !
adapterType , virtualHWVersion
geometry.cylinders , geometry.heads , geometry.sectors
Getting the data together
the createType - parameter can have one of these values:
monolithicFlat , monolithicSparse
, twoGbMaxExtentFlat , twoGbMaxExtentSparse
, fullDevice , partitionedDevice
vmfs , vmfsSparse
, custom
In case you need to recreate either one of this types
fullDevice , partitionedDevice
better create them from scratch using the GUI.
In a vmware.log the "createType" is referenced here (see example
extracts of a vmware.log in red)
... vmx| DISK: OPEN scsi0:0 'E:\bsd2\obsd.vmdk' persistent R[(null)]
... vmx| DISKLIB-DSCPTR: Opened [0]: "obsd-s001.vmdk" (0xa)
... vmx| DISKLIB-DSCPTR: Opened [1]: "obsd-s002.vmdk" (0xa)
... vmx| DISKLIB-LINK : Opened 'E:\bsd2\obsd.vmdk' (0xa): twoGbMaxExtentSparse,
4194304 sectors / 2048 Mb.
... vmx| DISKLIB-LIB : Opened "E:\bsd2\obsd.vmdk" (flags 0xa).
... vmx| DISK: OPEN 'E:\bsd2\obsd.vmdk' Geo (261/255/63) BIOS Geo (261/255/63)
freeSpace=40976Mb
the names of the split chunks and the name of the descriptorfile
can be looked up here
... vmx| DISK: OPEN scsi0:0 'E:\bsd2\obsd.vmdk'
persistent R[(null)]
... vmx| DISKLIB-DSCPTR: Opened [0]: "obsd-s001.vmdk"
(0xa)
... vmx| DISKLIB-DSCPTR: Opened [1]: "obsd-s002.vmdk"
(0xa)
... vmx| DISKLIB-LINK : Opened 'E:\bsd2\obsd.vmdk' (0xa): twoGbMaxExtentSparse,
4194304 sectors / 2048 Mb.
... vmx| DISKLIB-LIB : Opened "E:\bsd2\obsd.vmdk" (flags 0xa).
the geometry entries are here
... vmx| DISKLIB-LINK : Opened 'E:\bsd2\obsd.vmdk' (0xa):
twoGbMaxExtentSparse, 4194304 sectors / 2048 Mb.
... vmx| DISKLIB-LIB : Opened "E:\bsd2\obsd.vmdk" (flags 0xa).
... vmx| DISK: OPEN 'E:\bsd2\obsd.vmdk' Geo (261/255/63) BIOS Geo (261/255/63)
freeSpace=40976Mb
the tools-version is mentioned here - a value of 0 means that this vmdk
was used
by a VM that had no vmware-tools installed when it was last used.
... vmx| DISKUTIL: scsi0:0 : toolsVersion = 0
the adapterType can have one of the values: ide , buslogic , lsilogic
double-check the controller-type against the entry in the vmx-section
... vmx| DICT scsi0.virtualDev = lsilogic
the size of all single chunks together in sectors is listed here
... vmx| DISKUTIL: scsi0:0 : capacity=4194304
If the vmdk uses several data chunks you must calculate or better guess
the size of each chunk.
The type twoGbMaxExtentSparse
usally has 4192256 sectors large chunks.
The type twoGbMaxExtentFlat
usally has 4193792 sectors large chunks.
In both types the last chunk varies in size to fit to the overall capacity.
Warning: if a vmdks was created with custom size chunks or was expanded
earlier you can NOT follow this rule-of-thumb for calculating the size of
the several extent description lines !
Once we have all the parameters together we can now re-create the description
# Disk DescriptorFile
version=1
CID=43e5bb88
parentCID=ffffffff
createType="twoGbMaxExtentSparse"
# Extent description
RW 4192256 SPARSE "obsd-s001.vmdk"
RW 2048 SPARSE "obsd-s002.vmdk"
# The Disk Data Base
#DDB
ddb.toolsVersion = "0"
ddb.adapterType = "lsilogic"
ddb.geometry.sectors = "63"
ddb.geometry.heads = "255"
ddb.geometry.cylinders = "261"
ddb.virtualHWVersion = "4"
How to restore a lost vmx-file from a *.vmsn
A *.vmss file = Virtual machine snapshot is a binary file with metadata
for the snapshot.
It has a copy of the vmx-file at a fixed location and so we use dsfo.exe
again - or dd on Linux.
dsfo.exe blabla-snapshot.vmsn 100 10000 blabla.vmx
If you want to edit and reinject the vmx-file into the *.vmsn use
dsfi.exe blabla-snapshot.vmsn 100 10000 blabla.vmx
On Linux extract with
dd if=blabla-snapshot.vmsn of=blabla.vmx bs=1 skip=100
count=10000
To inject use
dd if=blabla.vmx of=blabla-snapshot.vmsn bs=1 skip=100
count=10000
How to restore a lost vmx-file from a *.vmss
A vmss-file = Virtual machine suspended state also has a copy of the vmx
file that was used.
The location inside the binary file varies so no extraction command can
be given.
How to restore a lost vmx-file from a log
in case you got a good last vmware.log extracting the last used vmx-file
is quite easy:
Search through the log for DICT-entries - these entries first list the preferences
settings
and then it prints the vmx-parameters that were used .
The relevant section starts at keyword: CONFIGURATION
- next section is USER DEFAULTS.
All entries in between are part of the vmx-file. Just copy that section
and delete the time-stamp in front of the line ...
The example shows a vmware.log - the embedded vmx-file is shown in blue.
Procedure works on all platforms.
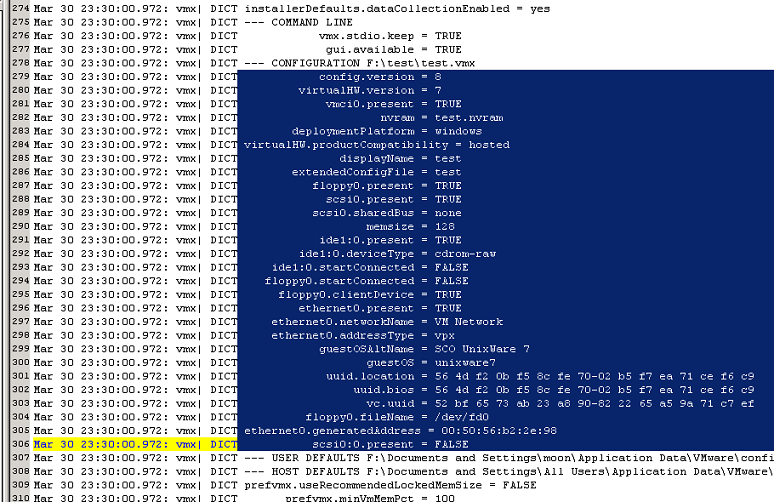
If you use a good text-editor like Ultraedit you can hilight the blue section and copy and paste it into a new file.
Please note:
you need to wrap the arguments in quotes - compare the black embedded text
with the out-put vmx listed below.
After extraction and final polishing the file should look like this.
Note that "FALSE" is the same as "false", "TRUE"
is the same as "true".
The sequence of lines does not matter.
You can sort the lines alaphabetically if you like.
Undefined parameters with = "" can be skipped.
config.version = "8"
virtualHW.version = "4"
scsi0.present = "TRUE"
scsi0.virtualDev = "lsilogic"
memsize = "256"
scsi0:0.present = "TRUE"
scsi0:0.fileName = "openbsd41system.vmdk"
ide1:0.present = "TRUE"
ide1:0.fileName = "H:\home\moon\Desktop\cd41.iso"
ide1:0.deviceType = "cdrom-image"
floppy0.autodetect = "TRUE"
ethernet0.present = "TRUE"
ethernet0.connectionType = "nat"
ethernet0.wakeOnPcktRcv = "FALSE"
usb.present = "FALSE"
sound.present = "FALSE"
sound.fileName = "-1"
sound.autodetect = "TRUE"
svga.autodetect = "TRUE"
mks.keyboardFilter = "allow"
displayName = "openbsd41"
guestOS = "freebsd"
nvram = "FreeBSD.nvram"
deploymentPlatform = "windows"
virtualHW.productCompatibility = "hosted"
tools.upgrade.policy = "useGlobal"
floppy0.startConnected = "FALSE"
floppy0.fileName = "A:"
ethernet0.virtualDev = "e1000"
ethernet1.virtualDev = "e1000"
ethernet1.present = "TRUE"
ethernet1.connectionType = "custom"
ethernet1.vnet = "VMNet9"
ethernet1.wakeOnPcktRcv = "FALSE"
isolation.tools.hgfs.disable = "TRUE"
ethernet0.addressType = "generated"
ethernet1.addressType = "generated"
uuid.location = "56 4d 14 e1 14 6c 51 a3-9d 82 14 8d ed d6 ba a1"
uuid.bios = "56 4d 14 e1 14 6c 51 a3-9d 82 14 8d ed d6 ba a1"
scsi0:0.redo = ""
ethernet0.generatedAddress = "00:0c:29:d6:ba:a1"
ethernet0.generatedAddressOffset = "0"
ethernet1.generatedAddress = "00:0c:29:d6:ba:ab"
ethernet1.generatedAddressOffset = "10"
extendedConfigFile = "FreeBSD.vmxf"
tools.
How to create a vmdk that can be stored on a set of CDs ?
Workstation can create vmdks split in 2Gb slices.
This slices do not fit on a CD so you may create a vmdk with custom size
with vmware-vdiskmanager.
See the follwing example
vmware-vdiskmanager -c -a ide -s 670Mb -t 1 cd-slices-disk.vmdk
vmware-vdiskmanager -x 1340Mb cd-slices-disk.vmdk
vmware-vdiskmanager -x 2010Mb cd-slices-disk.vmdk
vmware-vdiskmanager -x 2680Mb cd-slices-disk.vmdk
vmware-vdiskmanager -x 3350Mb cd-slices-disk.vmdk
vmware-vdiskmanager -x 4020Mb cd-slices-disk.vmdk
vmware-vdiskmanager -x 4690Mb cd-slices-disk.vmdk
This creates a vmdk named cd-slices-disk.vmdk of the nominal size 4690 Mb
with each single chunk exactly 670 Mb.
This should fit on a set of CDs easily.
The first line creates the first chunk.
The other lines simply expand the first chunk multiple times.
<<<
Whats better - one-piece vmdks or split vmdks ?
Comparison of both types of sparse (growing) virtual disks
monolithicSparse = a growing disk in one piece
twoGbMaxExtentSparse = a growing disk split in to pieces that have a max
size of 2 Gb
The one-piece type seems to be a reasonable choice at first sight - following
the simple straight logic:
one virtual disk = one file
Lets have a deeper look at the differences:
| VMware name | monolithicSparse | twoGbMaxExtentSparse | ||
|---|---|---|---|---|
| number of dependant files | 1 | 2 - 477 | ||
| first impression: | looks reasonable: one disk = one file |
what the hell are all these files good for ? | ||
max size of single chunk
|
950 Gb | 2 Gb | ||
| descriptor | embedded | external | ||
| handling of backups | tricky with large disks | excellent | ||
| can be used from alien filesystems | unlikely | likely | ||
| free diskspace required for shrinking | up to 950 Gb | 2Gb | ||
| free diskspace required to merge a snapshot | up to 950 Gb | 2Gb | ||
| free diskspace required to defragment the disk | up to 950 Gb | 2Gb | ||
| DVD backup | easy for disksizes that fit in one piece - tricky for large disks | no problem | ||
| Fat32 backup | disks smaller than2 Gb only | yes | ||
| network backup via ftp, samba or cifs | unreliable | no problem | ||
| skills required to fix simple errors | very advanced | easy | ||
| probabilty that a users messes up the disk with manual editing | very high | low | ||
| tool required for basic manual editing | Windows: dsfo.exe / dsfi.exe Linux: dd |
simple texteditor | ||
| encryption | embedded descriptor can be encrypted | |||
| Summary: | not suitable for a default choice |
editors choice for average usage |
||
Conclusion:
VMware Workstation uses the monolithic-disk type as a default.This is not very userfriendly - especially for beginners.
How do I check if a snapshot is an orphan ?
Orphaned snapshots are snapshots that are not part of an existing snapshot-chain.
This should never happen - but in some cases ....
- unwise user action some time ago
- Workstation or ESX crash
- host OS crash or power-failure
- running out of diskspace during a snapshot action
- misconfigured or buggy behaviour of VMware tools like VCB or VDR
- misconfigured or buggy behaviour of third party backup tools - especially
for ESX and ESXi
It is not trivial to check if a snapshot is orphaned for several reasons
- looking at the snapshot number in the filename is unreliable
- looking at the vmsd file is unreliable
- looking at the filename hint in the vmx-file only references the last
used one at the end of the chain
- a snapshot maybe used by a VM in a different directory
- a snapshot maybe part of a linked clone in a different directory
- a snapshot may be the only part of a a separete branch in the snapshot-tree
To be absolutely sure if this snapshot is orphaned and so can be deleted
we have to check if it is referenced
by any of the other vmdk-descriptions found in the same directory.
In case any other vmdk references the snapshot it may be part of one branch
of the tree.
In case the snapshot is a direct child of the basedisk it may be a valid
separate branch all by itself.
In case the CID or parentCID of the snapshot are referenced by any other
vmdk it may be a required snapshot even if the parentfile name hints don't
match.
What is the size of the snapshot file ?
The larger it is the longer it has been in use - the more valuable data
may be stored in it.
Even If it is very small it may have never been used but it also may contain
a single file - maybe just THE important one.
Long story short: you have to make an educated guess after analysing the
other vmdks in the same directory.
Automated scripts that check for orphaned snapshots are only trustworthy
if you can rule out user-mistakes.
<<<
Should I defragment inside my guests ?
That depends.
If the VM uses monolithicFlat
, twoGbMaxExtentFlat or
vmfs (thick provisioned) then it behaves
almost like a regular physical disk and the general advice to defragment
regularly can be followed.
If the VM uses any of the other sparse types , or uses a snapshot or vmfs
(thin provisioned) then the result of a defragmentation inside the guest
will be a enlarged vmdk with dubious performance gain - if any.
So in effect the whole action is contra-productive.
Defragmenation inside a guest that uses any type of sparse disk is only
useful if the resulting larger vmdk is shrinked after doing the defragmentation
inside the guest.
On Workstation this can be done with the vmware-tools shrink option or with
vmware-vdiskmanager.
Similar on ESX the disk has to be wiped first - either using the vmware-tools
or sdelete or dd.
After that it can be copied into a new thin provisioned vmdk with vmkfstools
for example.
<<<
© Ulli Hankeln 2010